Arête - a TimeWarrior menu bar app for macOS

For a long time I’ve been using TimeWarrior for tracking which projects I’m spending my time on. It’s a great tool for the task, but too often I need to switch to another terminal to check if I’ve remembered to start tracking. What’s been missing is a small indicator in the macOS menu bar showing active tracking, so I finally made one. I named it Arête, the Greek concept of excellence through the full use of one’s capabilities, and also the geological term for a sharp mountain ridge – because I like climbing mountains.
It’s a pure frontend to the TimeWarrior “timew” command, and only covers a small subset of what it can do. I aim to make it cover everything I need on a daily basis, and expect to still be using the “timew” cli for more seldom used tasks like modifying tags, adding/removing tags for past activities, and more.
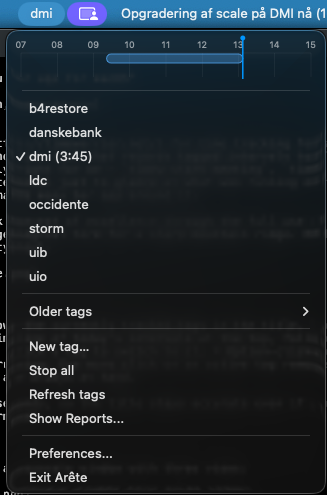
What it does
Arête sits in the menu bar and shows the currently tracked tags in the title. The dropdown expands to a live mini timeline of today’s intervals at the top, followed by a checklist of all your recent tags. lick a tag to switch to it; ⌥ Option-click to add it alongside whatever is already running.
The app pools timew every few seconds, so that the title always stay accurate even if your run “timew” directly in the terminal.
Reports
The Show Reports… entry opens a separate window with view for daily, weekly, monthly and custom time range reports. Anonymized example:
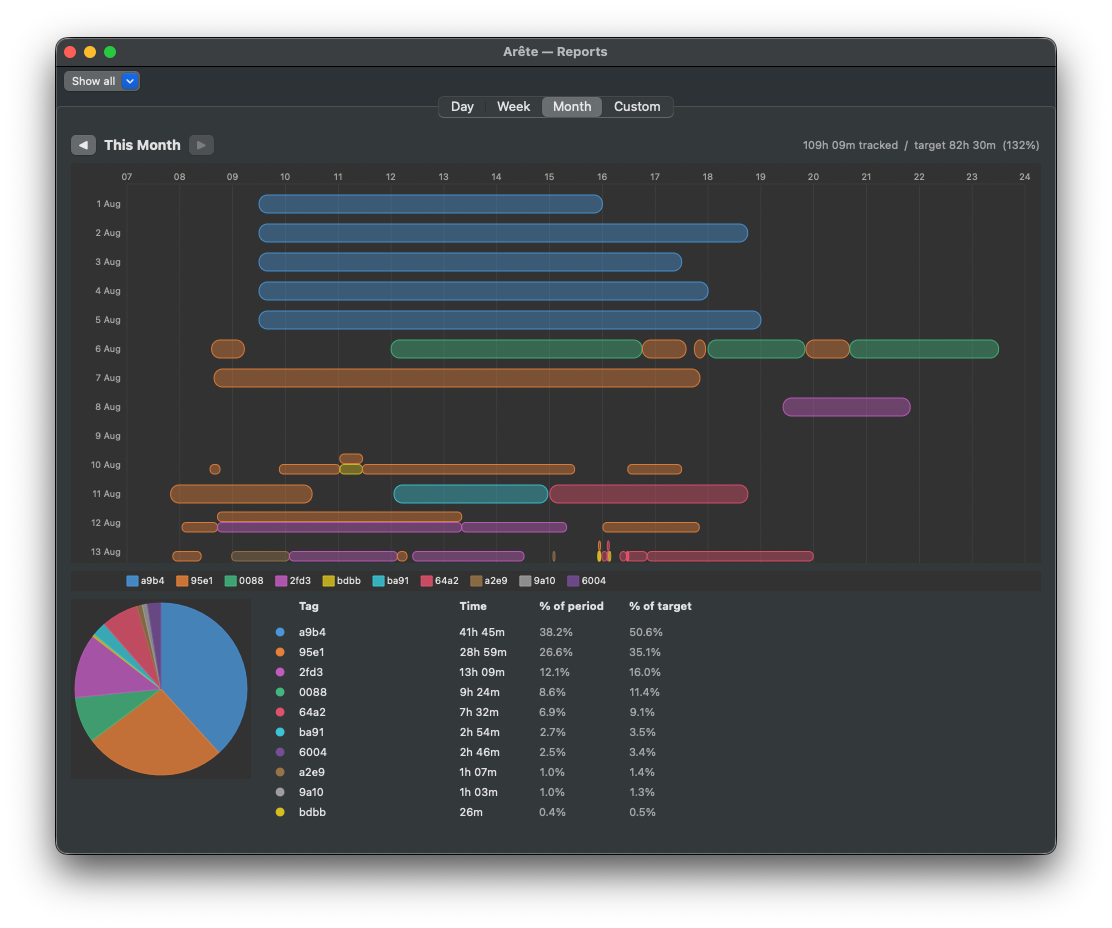
- Today / This Week / This Month tabs, each with navigation to browse history.
- A timeline — colour-coded horizontal bars showing every tracked interval.
- A pie chart — each tag’s share of a configurable work-day target (default 7.5 h).
- A summary table — time per tag and percentage of target, sortable and exportable to CSV via right-click.
Installation
git clone https://tanso.net/Arete.git
cd Arete
make
This builds Arête as a standalone macOS .app bundle inside a drag-and-drop .dmg installer in dist/Arete.dmg.
You can also download a prebuilt image from https://tanso.net/Arete/Arete.dmg, but because the built application is unsigned, macOS security may block it from launching the first time with an “unidentified developer” warning. To run it, open macOS System Settings, go to Privacy & Security, scroll down to the Security section, and click Open Anyway.
To test it without first installing to it:
git clone https://tanso.net/Arete.git
cd Arete
make run
Feedback
Feedback of if it’s useful, or what’s missing, will be much appreciated! Drop me an email at janfrode@tanso.net.